One day, your emails are reaching inboxes without issue. Next, they are bouncing, disappearing into spam folders, or not arriving at all.
If that sounds familiar, there is a good chance your IP address has been blacklisted. It happens faster than most people expect, and the consequences hit immediately. Email delivery stops. Business communications bounce. In some cases, your website starts triggering browser security warnings.
The good news is that blacklisting is fixable. But only if you approach it in the right order.
Most guides skip the most important step: fixing the root cause before requesting removal. Blacklists verify that the underlying problem is resolved before accepting delisting requests. Request removal without fixing the issue first, and you will be re-listed within days, sometimes hours.
This guide walks you through every step in the correct sequence, including exactly how to submit removal requests to the major blacklists, what to do when a request is denied, and how to make sure it does not happen again.
What Does It Mean to Be on a Blacklist?
Basically, it’s a list of IP addresses that someone somewhere thinks are bad or doing weird stuff. It’s used by ISPs, email servers, security tools, firewalls – you name it – to figure out if they should let you through the digital gate.
There are two main types.
Public or External blacklists: these are the third-party databases from companies like Spamhaus, Barracuda, and SpamCop. ISPs, mail providers, etc. All use these lists for filtering traffic from around the world. So if you end up on one, everyone who checks that list will flag your traffic suspiciously.
Internal blacklists are maintained by individual ISPs, email providers, or companies. Gmail, Microsoft, and Yahoo all maintain internal blocklists that do not appear in standard external blacklist checks. Your IP might appear clean on every public checker and still be blocked by a specific provider.
The distinction matters because the removal process is different for each. External blacklists have formal delisting procedures. Internal blacklists often require contacting the provider directly.
Being blacklisted does not automatically mean you did something wrong. Your IP can end up on a blacklist because a device on your network was compromised, because you share a server with someone who was abusive, or because you inherited a previously tarnished IP address from a hosting provider. Whatever the cause, the removal process is the same.
How to Tell If Your IP Is Blacklisted
The most obvious sign is email bouncing. When your IP is blacklisted, receiving mail servers send back a non-delivery report. These messages typically contain the name or URL of the blacklist that flagged you.
A bounce message that says something like “Message rejected due to IP [x.x.x.x] listed on RBL [blacklist name]” is telling you exactly where to start.
Other signs include:
- Emails consistently land in recipients’ spam folders rather than their inboxes
- A sudden and unexplained drop in email open rates
- Contacts are telling you they are not receiving your messages
- Browser security warnings are appearing on your website
- Connections from your server are being refused or rate-limited by other services
If you see any of these, do not wait. Run a blacklist check immediately. The sooner you identify the listing, the faster you can act.
Step 1: Find Every Blacklist You Are On
Before you can fix anything, you need to know exactly where you are listed. A single IP can appear on multiple blacklists simultaneously, and each one requires a separate removal request.
Start with DarkScout’s IP Reputation Checker. It gives you an immediate read across security-focused intelligence databases and is the fastest starting point for understanding your current standing.
Then cross-check with these specialized tools:
MXToolbox checks your IP against dozens of major blacklists in a single query. It is one of the most comprehensive multi-blacklist checkers available and clearly shows which specific lists have flagged you.
Spamhaus Blocklist Lookup checks directly against Spamhaus’s own databases, which are the most widely used blacklists in the world. If you are on Spamhaus, most ISPs and email providers are already treating your traffic with suspicion.
Talos Intelligence (Cisco) shows your reputation within Cisco’s security ecosystem, which is widely used in enterprise email filtering and network security appliances.
Google Postmaster Tools gives you Gmail-specific reputation data. If your deliverability problem is specifically with Gmail users, this tool tells you exactly what Gmail sees when it evaluates your IP.
Microsoft SNDS, Smart Network Data Services, gives you details on how Microsoft’s email servers treat your IP, very helpful in telling you whether your emails are being blocked by Microsoft’s O365 and Outlook.com servers.
Record every blacklist where your IP appears. You will need this list in Step 4. Do not request removal from any of them until you have completed Steps 2 and 3.
Step 2: Understand Why You Were Listed
This is the step most people skip because they want to jump straight to requesting removal. That is a mistake.
Blacklists verify that the underlying problem is resolved before accepting delisting requests. Submitting a request without fixing the cause results in denial or immediate re-listing.
Each blacklist typically provides a reason for the listing when you look up your IP on their site. The most common causes are:
Spam complaints: Someone marked your IP address as sending spam emails. That might mean that something you’re sending isn’t great, or your mail server might have been compromised and is sending emails without your knowledge.
Open relay: Your mail server was configured to forward any email, which means you’re giving spammy emails a way out into the world. It often happens to older servers.
Malware or botnet activity. A device using your IP was infected and participating in spam campaigns, distributed attacks, or other malicious activity. This can happen entirely without your knowledge.
Spam trap hits. Your IP sent email to addresses that are specifically designed to catch senders with poor list hygiene or aggressive sending practices.
Policy-based listing. Some blacklists, like Spamhaus’s PBL (Policy Block List), list residential or dynamic IP addresses by policy, not because of any wrongdoing. If you’re using a residential IP to run a mail server, this is likely the culprit.
Inherited reputation: The previous user of your IP address was a real dirtbag. If you recently got a new IP address or hosting, double-check if it was ever listed before.
Look at the blacklist’s explanation for your specific listing. Read it carefully. The removal request you submit in Step 4 should directly address the reason stated.
Step 3: Fix the Root Cause First
Do not submit a single delisting request until this step is complete.
What you need to do depends on why you were listed.
If a Device Was Compromised
Run a full malware scan on every device connected to your network. If you find an infection, remove it completely before doing anything else. Change all passwords on affected systems. Check outbound traffic logs for unusual activity or connections to external servers you do not recognize.
If credentials were stolen as part of the compromise, they may already be circulating on dark web markets. Checking your dark web exposure at this point tells you whether attackers have already used the stolen data in ways that could cause further damage.
If Your Mail Server Is an Open Relay
Use a service such as MXToolbox’s SMTP relay test to confirm that you’re not relaying mail from unknown senders. Shut that open relay down right now and make sure your configuration is such that you’re only relaying from approved senders of your domain.
If Your Sending Practices Caused the Listing
Put your mail on hold for now. You can’t send another email until you address whatever the issue is.
Clean your email list. Remove invalid addresses, hard bounces, inactive subscribers, and anyone who has marked your emails as spam. Implement proper authentication by setting up SPF, DKIM, and DMARC if they are not already in place. Our guide on email spoofing prevention covers exactly how to configure each of these.
If You Are on Spamhaus’s PBL
The PBL is not an accusation. It lists IP addresses that should not be sending email directly, typically residential and dynamic IPs. If you are running a legitimate mail server on a static business IP, you can request removal. If you are on a residential connection, the right solution is to route your email through your ISP’s SMTP relay or a dedicated sending service.
If You Inherited a Bad IP
You may not need to fix anything on your end. But you do need to document that the previous abuse occurred before you took over the IP. This documentation becomes part of your delisting request.
Keep records of every fix you make. Date-stamped logs, screenshots, and technical documentation all strengthen your delisting request and demonstrate that the problem has been genuinely resolved.
Step 4: Submit Delisting Requests
With the underlying issue solved and recorded, you can start submitting removal requests. Different blacklists have different procedures, but these are the details you’ll need for the most common.
Spamhaus
Spamhaus is the most widely used and most important blacklist to be removed from. It maintains several sub-lists: the SBL (Spamhaus Block List) for known spam sources, the XBL (Exploits Block List) for compromised systems and malware, the PBL (Policy Block List) for IPs that should not send email directly, and the DBL (Domain Block List) for domains used in spam.
Go to the Spamhaus Blocklist Removal Center at spamhaus.org. Look up your IP to see which specific list you are on and why. Read the listing reason carefully. Follow the instructions provided for your specific list type. Spamhaus verifies that the problem is resolved before accepting removal requests. Expect a response within 24 to 48 hours for most listings.
Note that Spamhaus data is also used by Microsoft. If your IP is on Spamhaus, checking Spamhaus first before submitting a Microsoft-specific request can save you time.
Barracuda
Go to barracudacentral.org and look up your IP in their lookup tool. If you are listed, use the removal request form on their site. Barracuda verifies that the IP is no longer sending spam before processing removal. They typically respond within 12 to 24 hours.
SpamCop
SpamCop’s system is automated and relies on user spam reports. If you stop sending spam or abusive traffic, SpamCop typically auto-delists within 24 to 48 hours without new reports coming in. It is often the first blacklist to flag a problem and the fastest to clear once the problem is stopped.
SpamCop is most useful as an early warning signal. A new listing here means something is wrong and needs immediate investigation.
Microsoft (Outlook and Microsoft 365)
Go to the Microsoft Anti-Spam IP Delist Portal at sender.office.com. Enter the email address that received the bounce message and the IP address specified in the error. Submit the form and click the confirmation link in the email Microsoft sends you.
If you receive a 5.7.511 Access Denied error, you cannot use the self-service portal. Instead, forward the full non-delivery report to delist@microsoft.com, including the NDR code and your IP address. Removal can take up to 24 hours after submission.
For ongoing Microsoft deliverability issues, enroll in Microsoft’s SNDS program to monitor how your IP is performing with Microsoft’s email infrastructure.
Google (Gmail)
Gmail does not run a standard, public blacklist, as they rely on internal reputation signals that are not openly available. If your messages continue to go to your Gmail spam folder, utilize Google’s Postmaster Tools to help diagnose the issue.
If the problem is severe, submit a report through Google’s Email Sender Help Center. Google does not have a standard delisting form, so the process is less predictable than that of other providers. The most effective approach is to fix the underlying sending issues and let your reputation recover naturally through consistent, clean behavior.
UCEProtect
UCEProtect operates at three levels. Level 1 lists individual IPs. Level 2 lists entire IP ranges with significant abuse. Level 3 lists entire ASNs (networks) with high abuse rates.
Level 1 listings typically expire automatically within seven days if no new abuse is reported. UCEProtect also offers a paid express delisting option. For Level 2 and Level 3, the listing is based on the behavior of others in your IP range or network, which means your individual delisting options are limited. Contact your hosting provider if you are listed at Level 2 or 3, as the fix needs to happen at the infrastructure level.
Talos Intelligence (Cisco)
Go to talosintelligence.com and look up your IP. If your reputation is listed as Poor, submit a dispute through the Talos reputation dispute form on their site. Include documentation of what caused the listing and what you have done to fix it. Cisco reviews submissions manually.
Step 5: Rebuild Your Reputation After Delisting
Getting delisted is not the end. It is actually the beginning of regaining the trust.
Restart Email Sending Gradually
Do not flood the inboxes again right after you are delisted. If you flood after a dead period of inactivity, this looks questionable to the ISPs, and you will re-list before you even start building a clean sending history.
Begin by sending small amounts to your most passionate subscribers. Add more volume over the two to four weeks. Keep a close watch on your bounce rates, spam complaint rates, and deliverability throughout your warmup.
Monitor Your Blacklist Status Continuously
Check your IP reputation regularly after delisting. Use IP Reputation Checkers alongside MXToolbox to stay on top of your status across multiple databases.
Set up alerts if possible so you are notified immediately if your IP appears on a new list. The faster you catch a listing, the less damage it causes.
Keep Your Email Authentication Current
Verify that SPF, DKIM, and DMARC are correctly put in place and that they do not drift away from what should be. These records should be regularly reviewed once in a while, particularly when you are implementing new changes in your email system. Correctly authenticated emails are more easily welcomed by ISPs, giving you more speed in reputation recovery.
What to Do If Your Delisting Request Is Denied
When a request for delisting is denied, one of three reasons is usually the cause: either the original problem was not thoroughly addressed, a continuing attack from your IP is present, or the blacklist needs further proof before allowing delisting.
Have another look at your fix. Return to Step 3. Confirm that the problem you believed you’d addressed hasn’t reappeared.
Wait and retry. Some blacklists will reject a second request after only a few hours. Wait up to 24 to 48 hours, just make sure you are not being abusive again, and then resubmit with better proof of your corrective action.
Escalate with documentation. If you do actually think that the listing is invalid, or that it has been done to you as a result of someone else’s behavior on a cable network, document as thoroughly as you can. Include date/time stamped logs showing no inappropriate activity, as well as before and after shots of your server configuration, and a retelling of the event.
Contact your hosting provider. If you are on a shared IP and the abuse is coming from another tenant on the same server, your hosting provider needs to intervene. This is their responsibility. Escalate the issue formally and in writing.
Consider a new IP address. If repeated delisting attempts fail and the reputation damage is severe, requesting a new IP from your hosting provider or ISP may be the most practical path forward. Before doing this, make absolutely certain the underlying cause is resolved. A new IP with the same underlying problem will develop the same reputation issues just as quickly.
When moving to a new IP, always run it through DarkScout’s IP Reputation Checker and other blacklist tools before you start sending. Verify that the new IP does not carry a history from its previous owner.
How to Prevent Blacklisting From Happening Again
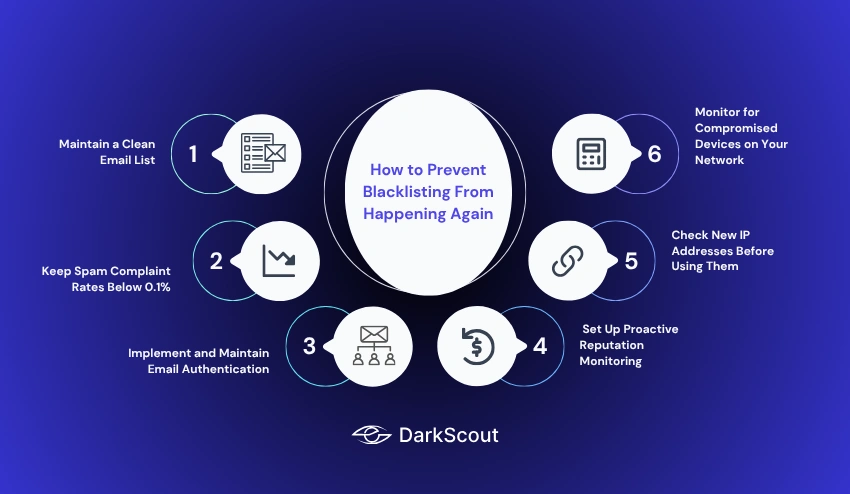
Removal is reactive. Prevention is far less disruptive. These are the practices that keep IPs off blacklists.
1. Maintain a Clean Email List
Remove invalid addresses and hard bounces immediately. Keep bounce rates below 3%. Remove subscribers who have not engaged in six months. Never purchase email lists or scrape addresses. Each of these practices reduces the spam signal that triggers blacklisting.
Implement double opt-in for new subscribers so you are certain the addresses on your list belong to people who want to hear from you.
2. Keep Spam Complaint Rates Below 0.1%
Google and Yahoo both require senders to keep spam complaint rates below 0.1% for sustained deliverability. Above that threshold, you are on a path to blacklisting. Monitor complaint rates actively and remove anyone who complains immediately.
3. Implement and Maintain Email Authentication
SPF, DKIM, and DMARC are not optional for anyone sending business email in 2026. They prevent your domain from being used in email spoofing campaigns that could damage your IP’s reputation through no fault of your own. They also signal to ISPs that you are a legitimate, professionally managed sender.
4. Monitor for Compromised Devices on Your Network
A device infected with malware can destroy your IP reputation overnight by participating in a botnet spam campaign you know nothing about. Regular security scanning of all network-connected devices catches infections before they generate the kind of outbound abuse that gets IPs blacklisted.
If you suspect a device has been compromised, treat it as a security incident. Credentials on infected devices frequently end up in stealer logs traded on dark web markets. Checking your email exposure through a regular email scan helps you detect whether compromised credentials are already circulating.
5. Check New IP Addresses Before Using Them
Any time you deploy new infrastructure, check the reputation of the IP addresses before you start using them. An IP with a poor history from its previous owner will create deliverability problems from day one, before you have done anything wrong.
6. Set Up Proactive Reputation Monitoring
Do not wait for emails to start bouncing before you check your reputation. Set up regular blacklist checks as a routine part of your infrastructure monitoring. Catching a new listing within hours of it appearing is far less disruptive than discovering it after days of failed email delivery.
DarkScout’s IP Reputation Checker gives you an instant view of your IP’s current standing. Make it part of your regular monitoring routine.